Do you ever miss that moment? The one where you sink a spoon into something truly decadent. A dessert that feels like a hug from the inside. If you’re watching your carbs, that simple joy can feel like a distant memory.
What if you could have it back? Imagine a rich, creamy treat that fits your lifestyle perfectly. This isn’t about giving things up. It’s about discovering something even better.
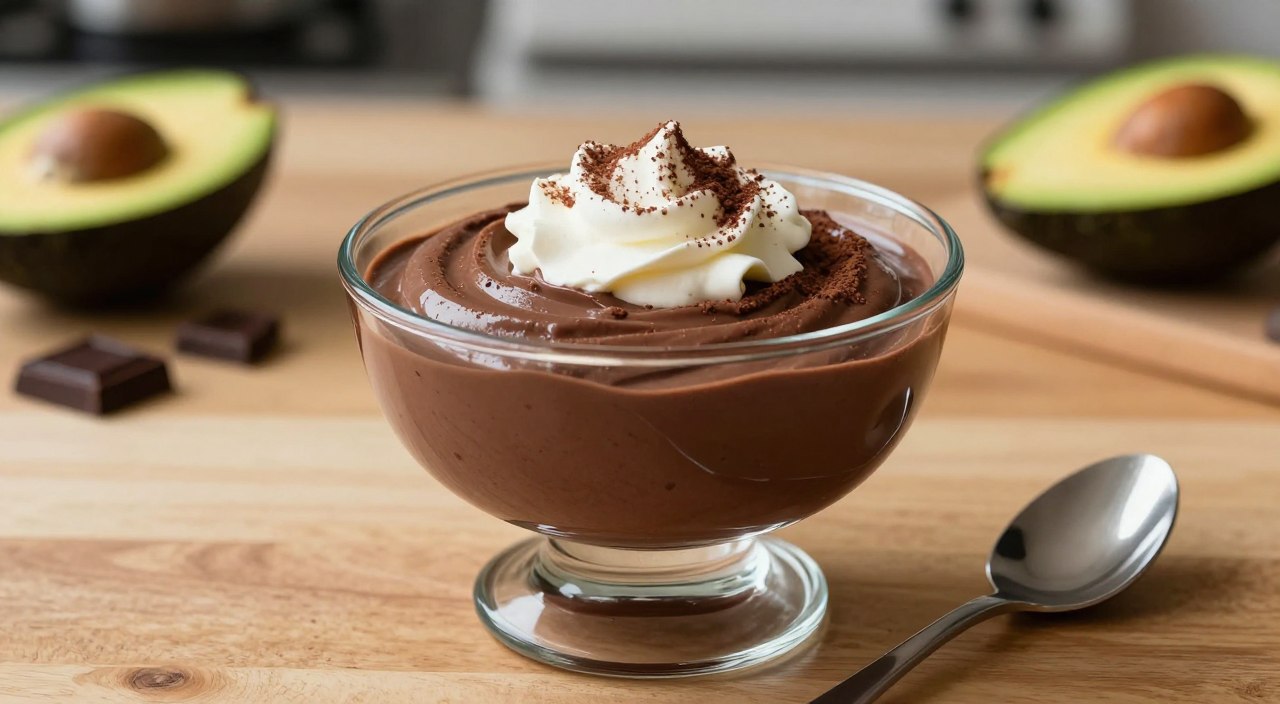
You’re minutes away from a game-changing recipe. In just 10 to 15 minutes, with a handful of simple ingredients, you can create magic. This luxurious dessert uses clever swaps like avocado to achieve a silky texture without the sugar.
It’s the perfect solution for a last-minute gathering or a sudden craving. This creation proves that eating well doesn’t mean sacrificing flavor. It means embracing it in a whole new way.
Ingredients and Tools for a Perfect Keto Chocolate Mousse
Your journey to creating this luxurious treat begins with selecting quality components. Having the right items on hand ensures your dessert turns out perfectly every time.
Key Ingredients and Their Role
The foundation of this dessert relies on a few essential ingredients. Cream cheese or heavy cream creates the rich, smooth base. For the cream cheese variation, you’ll need about 3 ounces softened at room temperature.
Your choice of sweetener is crucial. Powdered zero-calorie options like Swerve dissolve beautifully. Use about 1/4 cup for the perfect balance.
Cocoa powder provides the deep chocolate flavor. Two tablespoons of unsweetened cocoa deliver that rich taste. A teaspoon of vanilla extract adds warmth and depth.
Essential Kitchen Tools to Get Started
You don’t need fancy equipment for success. A large mixing bowl is your main workspace. Chill it beforehand for best results when whipping cream.
An electric mixer helps achieve those perfect stiff peaks. A spatula gently folds everything together. These simple tools make the process smooth and enjoyable.
Remember to have your ingredients measured and ready. This preparation sets you up for dessert success.
Step-by-Step Preparation for a Creamy Avocado Mousse
Let’s roll up our sleeves and dive into the fun part—bringing this dessert to life. The process is straightforward, but a few key techniques ensure that silky, airy texture we’re after.
Preparing Your Avocado and Dark Chocolate
First, ensure your base ingredients are ready. If you’re using the cream cheese method, start by beating softened cream cheese in a large mixing bowl. Use an electric mixer until the texture is light and completely smooth.
For the whipped cream version, chill your cream and the large mixing bowl beforehand. This simple step helps the cream whip up faster and hold its shape better.

Mixing Methods for a Silky Texture
Now, combine your ingredients carefully. With the mixer on low, slowly add the heavy cream and vanilla to the cream cheese mixture. This prevents splashing and helps everything blend evenly.
Next, add your sweetener and cocoa powder. Keep the speed low at first to avoid a powdery cloud. Once incorporated, beat on high for just 1-2 minutes. You’ll see the mixture become light and fluffy.
The final touch for maximum airiness is folding. If you whipped cream separately, use a spatula to gently fold it into the chocolate base. This preserves all the volume you created.
Your delicious chocolate mousse recipe is ready in about 15 minutes. This quick keto chocolate mousse is a testament to how simple, quality ingredients can create something spectacular.
Tips for Achieving the Ideal Mousse Texture
The secret to a truly spectacular dessert lies in its texture. Getting it right means paying close attention to two key steps: whipping and folding. These techniques are what give your creation that light, airy quality.
Whipping Cream to Stiff Peaks
Start with a very cold bowl and your heavy cream. This chill helps the fat molecules stabilize quickly. Using an electric mixer, whip the cream on high speed.
Watch carefully. In just 1-2 minutes, stiff peaks will form. The whipped cream will be thick and hold its shape perfectly when you lift the beaters. Stop immediately once you see this. Overbeating makes the texture grainy.
Folding Techniques to Preserve Airiness
Now, switch to a spatula for the folding step. This is crucial for keeping the air in your whipped cream. Gently cut through the center of the mixture and lift it over the top.
Use a circular motion. Fold just until no white streaks remain. Be patient and gentle. This preserves the fluffy texture you worked so hard to create.
Finally, spoon the mixture into serving dishes gently. Avoid packing it down. This careful handling ensures every bite is cloud-like and delightful.
Creative Customizations for Your Keto Chocolate Mousse
Once you’ve mastered the basic formula, a world of creative possibilities opens up for personalizing your creation. This versatile dessert adapts beautifully to different tastes and dietary needs.
Flavor Enhancements and Extract Variations
Move beyond basic vanilla to explore exciting flavor profiles. Almond, mint, or orange extracts can transform your mousse into entirely new taste experiences.
A professional pastry chef trick involves adding instant coffee to intensify the chocolate flavor. This brings out deeper cocoa notes without making it taste like coffee.
Adapting the Recipe for Vegan and Dairy-Free Diets
For those avoiding dairy, full-fat coconut milk makes an excellent substitute. Use only the thick, creamy portion from the top of the can.
Your choice of sweetener also offers customization opportunities. Erythritol provides clean sweetness, while monk fruit adds subtle fruity notes.
These simple adjustments ensure everyone can enjoy this delightful dessert. The basic recipes serve as a perfect starting point for your keto culinary adventures.
Mastering the Art of Keto Chocolate Mousse
When you know exactly what’s in your food, you can enjoy it with complete confidence and peace of mind. This delicious treat offers impressive nutritional benefits that support your wellness goals.
Nutritional Insights and Carb Counts
Each serving contains only 2-7 grams of net carbs. You calculate net carbs by subtracting fiber and certain sweeteners from total carbohydrates.
This low carb approach makes the dessert easy to fit into your daily diet plan. The minimal carb content helps maintain your metabolic state.
Ensuring Balanced Macros on a Keto Diet
The fat content ranges from 20-38 grams per serving. This high fat ratio provides sustained energy while keeping you satisfied.
You’ll get 2-5 grams of protein in each portion. This modest amount supports your daily needs without disrupting macro balance.
With 190-373 kcal per serving, this dessert fits comfortably within most calorie targets. The nutrition profile includes beneficial minerals like potassium too.
Remember: You can adjust portion sizes to match your specific macro requirements. This flexibility makes the recipe adaptable to various diet approaches.
Serving, Storing, and Presentation Ideas
Presentation and storage are the finishing touches that elevate your dessert from good to great. How you serve and preserve your creation impacts both the experience and longevity.
Plating Suggestions to Impress Your Guests
For immediate enjoyment, serve your dessert right after preparation. This gives you a soft, creamy texture that’s wonderfully fresh.
If you prefer a firmer consistency, refrigerate for at least one hour. The flavor deepens beautifully during this time. Individual serving glasses create an elegant presentation.

Consider ramekins or small mason jars for restaurant-style appeal. Add visual interest with a dollop of whipped cream. A sprinkle of sugar-free chocolate or fresh berries completes the look.
Tips for Leftover Storage and Enjoyment
Store your creation in small containers rather than one large batch. This preserves the fluffy texture you worked so hard to achieve.
Your dessert stays fresh for 2-3 days when properly covered. The flavor often improves as ingredients meld together.
For longer storage, freeze individual portions in ice cube trays. You can also freeze the entire batch and thaw overnight. These storage tips ensure you always have a satisfying treat ready.
Final Thoughts on Your Delectable Keto Chocolate Avocado Mousse
Congratulations on mastering a dessert that bridges the gap between indulgence and wellness. Your mousse recipe delivers incredible richness without the sugar crash, proving healthy eating requires no sacrifice.
Even non-keto family members will adore this creation. They often can’t believe it’s sugar-free! The simplicity amazes—restaurant quality in just 15 minutes with basic tools.
Whether you prefer the cream cheese version or whipped cream alternative, both offer satisfying texture. This versatile chocolate mixture adapts easily for various diets too.
Remember: quality ingredients and proper technique create that professional finish. This isn’t just a dessert—it’s your gateway to guilt-free luxury that supports your health journey beautifully.
FAQ
Can I make this dessert ahead of time?
Absolutely! This treat actually benefits from being made in advance. Preparing it a few hours or even a day ahead allows the flavors to meld beautifully. Just be sure to store it covered in your refrigerator until you’re ready to serve.
My mixture turned out a bit lumpy. What did I do wrong?
Lumps usually happen if the avocado isn’t perfectly ripe or if the ingredients aren’t blended thoroughly. For the smoothest, silkiest texture, make sure your avocado is very soft. Using a high-powered blender instead of a food processor can also help achieve that dreamy consistency.
What’s the best sweetener to use for this recipe?
Powdered erythritol or monk fruit blends are excellent choices because they dissolve easily and don’t have a bitter aftertaste. Using a powdered form is key to avoiding any graininess in your final dish. Liquid stevia is another great option, but you’ll need to adjust the amount since it’s much sweeter.
How long will this keep in the refrigerator?
When stored in an airtight container, your creation will stay fresh and delicious for up to 3-4 days. The fats from the cream and avocado help it maintain its texture wonderfully. It’s a perfect make-ahead dessert for your week.
Is there a way to make this dairy-free?
Yes, you can easily adapt it! Simply replace the heavy whipping cream with well-chilled full-fat coconut cream. Whip it just as you would regular cream until you get those lovely stiff peaks. The result is just as rich and satisfying.